¶ Corso di Tecniche di protezione del Software
Questa pagina tratta il setup dell'ambiente di laboratorio.
¶ Indice dei contenuti
- Creare una nuova istanza
- Riportare su una istanza spenta
- Aggiungere o modificare un dojo
- Preparazione dojo esame
- Challenges
- Link Utili
¶ Creare una nuova istanza
Documentazione per la versione 42c1ef3d (in caso di problemi in versioni successive si suggerisce il checkout di questa)
- Se necessario creare una nuova macchina vedere la pagine gestione VMs
- Aprire le porte 22,80,443,2222 sul firewall (gestione FW)
- Aggiungere la macchina agli indirizzi statici sul DHCP (gestione DHCP) [FACOLTATIVO MA FORTEMENTE CONSIGLIATO]
- Aggiungere una entry DNS su bindmin (gestione DNS)
- Collegarsi alla vm tramite ssh (consigliato) o tramite il web-tui di pmox
- Installare docker:
curl -fsSL https://get.docker.io | sh - Aggiungere l'utente al gruppo docker:
sudo usermod -aG docker <username> - Abilitare netfilter:
sudo modprobe br_netfilter - Creare le 2 variabili di ambiente
DOJO_PATHeDATA_PATH(per comodità si può modificare/etc/environmente rifare il login) - Clonare il repository di pwncollege:
git clone https://github.com/pwncollege/dojo "$DOJO_PATH" - Buildare l'immagine di pwncollege (NOTA: ci impiega molto tempo quindi consiglio di runnarlo in una sessione di tmux):
docker build -t pwncollege/dojo "$DOJO_PATH" - Entrare nella directory di persistenza (
DATA_PATH) e creare un fileconfig.env(modificare i campi necessari):
DOJO_HOST=<entry_dns>.laser.di.unimi.it
VIRTUAL_HOST=<entry_dns>.laser.di.unimi.it
LETSENCRYPT_HOST=<entry_dns>.laser.di.unimi.it
DOJO_ENV=development
DOJO_WORKSPACE=full
WORKSPACE_KEY=
WORKSPACE_NODE=0
SECRET_KEY=e62806ac300bff3dcadf7129b857194e
UBUNTU_VERSION=20.04
INTERNET_FOR_ALL=False
MAIL_SERVER=
MAIL_PORT=
MAIL_USERNAME=
MAIL_PASSWORD=
MAIL_ADDRESS=
DOCKER_USERNAME=
DOCKER_TOKEN=
DISCORD_CLIENT_ID=
DISCORD_CLIENT_SECRET=
DISCORD_BOT_TOKEN=
DISCORD_GUILD_ID=
DEFAULT_INSTALL_SELECTION=yes
INSTALL_IDA_FREE=no
INSTALL_BINJA_FREE=no
INSTALL_WINDOWS=no
DB_HOST=db
DB_NAME=ctfd
DB_USER=ctfd
DB_PASS=ctfd
DB_EXTERNAL=no
BACKUP_AES_KEY_FILE=
S3_BACKUP_BUCKET=
AWS_DEFAULT_REGION=
AWS_ACCESS_KEY_ID=
AWS_SECRET_ACCESS_KEY=
MAC_HOSTNAME=
MAC_USERNAME=
MAC_KEY_FILE=
MAC_GUEST_CONTROL_FILE=10. Modificare la porta ssh:
- modificare /etc/ssh/sshd_config,
- aggiungere una riga Port 2222,
- riavviare sshd: sudo service sshd restart
11. Far partire il container (Il primo avvio ci impiega VERAMENTE tanto):
docker run \
    --name dojo \
    --privileged \
    -v "${DOJO_PATH}:/opt/pwn.college" \
    -v "${DATA_PATH}:/data" \
    -p 22:22 -p 80:80 -p 443:443 \
    -d \
pwncollege/dojo¶ Riportare su un istanza spenta
- Se la macchina è spenta vedere la pagina gestione VMs
- Collegarsi alla vm tramite ssh (consigliato) o tramite il web-tui di pmox
- Assicurarsi che le variabili di ambiente
DOJO_PATHeDATA_PATHsiano settate correttamente e che puntino rispettivamente alla directory di pwncollege e alla directory di persistenza. (Mirco: di solito nelle mie istanzeDOJO_PATH=/opt/dojoeDATA_PATH=/opt/dojo/data). - Se il container
dojoesiste ma è spento va cancellato condocker rm dojo - Una volta cancellato il container va fatto ripartire con il comando:
docker run --name dojo --privileged -v "${DOJO_PATH}:/opt/pwn.college" -v "${DATA_PATH}:/data" -p 22:22 -p 80:80 -p 443:443 -d pwncollege/dojo
(Mirco: per comodità dovrei aver creato un aliasdojo-runche runna il comando sopra indicato) - Il container dovrebbe a questo punto partire.
Per capire lo stato di avanzamento è possibile utilizzare il comando docker logs dojo, tuttavia l'output di questo comando è poco informativo:
[+] Initializing dojo.
[+] Data mount exists.
# github.com:22 SSH-2.0-5dfa2843
# github.com:22 SSH-2.0-5dfa2843
# github.com:22 SSH-2.0-5dfa2843
# github.com:22 SSH-2.0-5dfa2843
# github.com:22 SSH-2.0-5dfa2843
wg-quick: `wg0' is not a WireGuard interface
[#] ip link add wg0 type wireguard
[#] wg setconf wg0 /dev/fd/63
[#] ip -4 address add 192.168.42.1/24 dev wg0
[#] ip link set mtu 1420 up dev wg0
[+] Starting systemd. If this is the first start, the challenge container
will be built, which will take a very long time.Una volta raggiunto questo punto del log non si otterranno altre informazioni. Per informazioni sullo stato interno dei container utilizzare docker exec -ti dojo dojo logs oppure entrare nel container e guardare i log dei singoli container interni.
¶ Aggiungere o modificare un dojo
¶ Caratteristiche del dojo
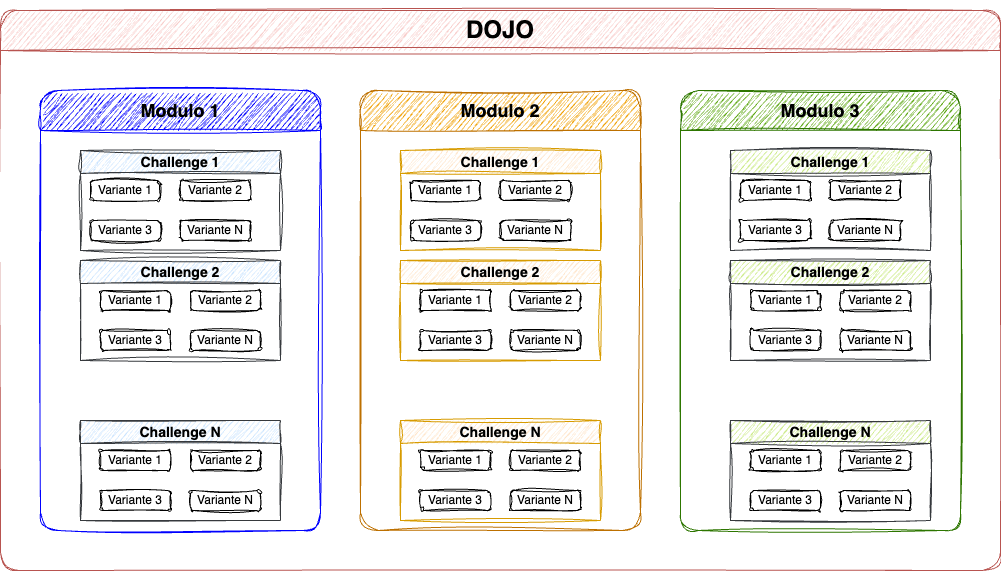
I dojo sono i componenti principali di pwncollege, sono delle collezioni di challenge divise in categorie. Le categorie prendono il nome di moduli, ogni modulo contiene le challenge che a loro volta hanno diverse varianti.I diversi componenti sono definiti secondo dei file yaml.
Di seguito un esempio di un file yaml per la definizione del dojo: dojo.yaml
id: appello-tps3
name: Appello TPS 09 09 2025
image: pwncollege/challenge-legacy:latest

award:
  belt: yellow

description: |
  Appello Esame 09/09/2025.
  Materiale utile per il corso:
  * [GDB CheatSheet](https://nextcloud.laser.di.unimi.it/s/riwx7MWgYwKDmCN)
  * [Pwntools CheatSheet](https://nextcloud.laser.di.unimi.it/s/wDWLGkiHpwsrSM9)
  * [Syscall table](https://nextcloud.laser.di.unimi.it/s/qp8DQjwLX34DiAA)
  * [x64 ASM CheatSheet](https://nextcloud.laser.di.unimi.it/s/PTe98jmZRrcxCd7)
type: topic

modules:
- id: shellcode-injection
- id: memory-errors
- id: return-oriented-programmingDi seguito un esempio di un file yaml per la definizione del modulo: module.yaml
name: Shellcode Injection
description: ""
challenges:
 - id: level-1-0
   name: level1.0
   description: Write a full exploit involving shellcode and a method of tricking the challenge into executing it.
- id: level-1-1
  name: level1.1
  description: Write a full exploit involving shellcode and a method of tricking the challenge into executing it.
 - id: level-2-0
   name: level2.0
   description: Write a full exploit involving injecting shellcode and a method of tricking the challenge into executing it.  Note, ASLR is disabled!
- id: level-2-1
  name: level2.1
  description: Write a full exploit involving injecting shellcode and a method of tricking the challenge into executing it.  Note, ASLR is disabled!
 - id: level-3-0
   name: level3.0
   description: Write a full exploit involving injecting shellcode and a method of tricking the challenge into executing it by utilizing clever payload construction.
- id: level-3-1
  name: level3.1
  description: Write a full exploit involving injecting shellcode and a method of tricking the challenge into executing it by utilizing clever payload construction.
 - id: level-4-0
   name: level4.0
   description: Write a full exploit involving injecting shellcode, reverse engineering, and a method of tricking the challenge into executing your payload.
- id: level-4-1
  name: level4.1
  description: Write a full exploit involving injecting shellcode, reverse engineering, and a method of tricking the challenge into executing your payload.
 - id: level-5-0
   name: level5.0
   description: Write a full exploit involving injecting shellcode, reverse engineering, seccomp, and a method of tricking the challenge into executing your payload.
- id: level-5-1
  name: level5.1
  description: Write a full exploit involving injecting shellcode, reverse engineering, seccomp, and a method of tricking the challenge into executing your payload.
- id: level-6-0
  name: level6.0
  description: Write a full exploit involving injecting shellcode, reverse engineering, seccomp, and a method of tricking the challenge into executing your payload.
- id: level-6-1
  name: level6.1
description: Write a full exploit involving injecting shellcode, reverse engineering, seccomp, and a method of tricking the challenge into executing your payload.pwnshop.yaml
variants: 16
keep_source: false
binary_name_prefix: toddlerone
build_image: pwncollege/challenge-legacy:latest
verify_image: pwncollege/challenge-legacy:latest
challenges:
- id: level-1-0
  challenge: ToddlerOneReturnToUserShellcode
  walkthrough: true
  seed: 13370100
- id: level-1-1
  challenge: ToddlerOneReturnToUserShellcode
  walkthrough: false
  seed: 313370100
- id: level-2-0
  challenge: ToddlerOneReturnToUserEnvvar
  walkthrough: true
  seed: 13370200
- id: level-2-1
  challenge: ToddlerOneReturnToUserEnvvar
  walkthrough: false
  seed: 313370200
- id: level-3-0
  challenge: ToddlerOneRepeatBackdoorReturnToEnv
  walkthrough: true
  seed: 13370300
- id: level-3-1
  challenge: ToddlerOneRepeatBackdoorReturnToEnv
  walkthrough: false
  seed: 313370300
- id: level-4-0
  challenge: ToddlerOneBackdoorCookie
  walkthrough: true
  seed: 13370400
- id: level-4-1
  challenge: ToddlerOneBackdoorCookie
  walkthrough: false
  seed: 313370400
- id: level-5-0
  challenge: ToddlerOneOverwriteSeccompRules
  walkthrough: true
  seed: 13370500
- id: level-5-1
  challenge: ToddlerOneOverwriteSeccompRules
  walkthrough: false
  seed: 313370500
- id: level-6-0
  challenge: ToddlerOneOverwriteSeccompRulesBackdoorCookie
  walkthrough: true
  seed: 13370600
- id: level-6-1
  challenge: ToddlerOneOverwriteSeccompRulesBackdoorCookie
  walkthrough: false
seed: 313370600Un esempio completo si può trovare quì: https://github.com/laser-unimi/dojo-tps
¶ Aggiunta e Modifica di un dojo a pwncollege
- Creare un repository su github contenente il dojo correttamente configurato (vedere esempio)
- Fare il login su pwncollege, navigare nella pagina dojos e cliccare sul + in fondo
- Inserire il nome del repository gh su pwncollege (e.g. laser-unimi/dojo-tps)
- Se il repository è privato sarà necessario aggiungere la chiave pubblica mostrata sotto tra le chiavi autorizzate del repository.
- Una volta aggiunto il dojo sarà possibile renderlo pubblico (rendendo il dojo ufficiale) oppure invitare solo alcuni studenti al dojo utilizzando il link.
- Sarà possibile applicare eventuali modifiche al dojo modificando direttamente il repository github e cliccando il tasto update nella pagina di gestione del dojo.
¶ Preparazione dojo esame
- Per l'appello d'esame di solito creo un repository privato clonando il repository dojo-tps e commentando tutte le challenge nei
module.yamlescluse quelle che voglio inserire nell'esame, dopodichè aggiungo il repository su pwncollege mantenendolo però privato. - Per quanto riguarda la configurazione della piattaforma per l'esame di solito utilizzo questa:
- Modifico la whitelist dei domini mail e inserisco come unico dominio
esame.tps(gli studenti si registreranno connome.cognome@esame.tps). - Aggiungo un registration code che comunico agli studenti al momento dell'esame (di solito un qualcosa tipo
appello+<data_appello>). - Banno tutti gli account che sono registrati in piattaforma.
- Il giorno dell'esame quando si sono registrati tutti correttamente rendo pubblico il dojo.
- Quando uno studente consegna o si ritira banno il suo account prima di farli andare via.
- Modifico la whitelist dei domini mail e inserisco come unico dominio
¶ Challenge abilitate
A seguire le challenge utilizzate per il corso con una breve descrizione:
¶ Buffer Overflow
| Binary Name | Level | Description |
|---|---|---|
| Babymem | 1 | Variable Overflow |
| 2 | Variable Overflow | |
| 3 | Return address hijacking | |
| 4 | Integer Overflow (bisogna inviare -1 come lunghezza del payload) | |
| 5 | Integer overlow (bisogna inviare 2^16 * 2^16 come lunghezza del payload) | |
| 6 | Return Address Hijacking saltando dopo i controlli ad inizio funzione | |
| 7 | Partial Address Overwrite (ASLR Bypass) | |
| 8 | ASLR Bypass + strlen bypass inviando \0 in mezzo alla stringa | |
| 9 | ASLR Bypass + Canary bypass (il payload viene letto 1 byte alla volta, l'offset di scrittura è sullo stack e va sovrascritto con la distanza dal ret per superare il canary) | |
| 10 | String terminator skip | |
| 12 | Canary Leak ( la funzione si può ripetere all'infinito senza rigenerare il canary) | |
| 13 | Variable Leak ( la flag è in memoria bisogna leakarla) | |
| 14 | Canary leak dallo stack non ripulito | |
| 15 | Canary bruteforce 1 byte alla volta |
¶ Shellcode Injection
| Binary Name | Level | Description |
|---|---|---|
| Toddlerone | 1 | Basic shellcode on a known address |
| 2 | Basic Shellcode injection on the stack | |
| 3 | Shellcode injection on the stack with canary leak | |
| 4 | Shellcode injection on the stack with canary leak and check bypass | |
| 5 | Shellcode injection on the stack with canary leak and check bypass | |
| 6 | Shellcode injection on the stack and ovverriding seccomp |
¶ Return Oriented Programming
| Binary Name | Level | Description |
|---|---|---|
| Babyrop | 1 | BOF + return address hijacking |
| 2 | BOF + return address hijacking to chain 2 function calls | |
| 3 | BOF + return address hijacking to chain 5 function calls with params | |
| 4 | BOF + ROP chain per chmod | |
| 5 | BOF + ROP chain per chmod utilizzando le stringhe contenute nel binario e symlink | |
| 6 | BOF + ROP chain: open + sendfile | |
| 7 | Ret-To-Libc with known address | |
| 8 | Libc address leak + Ret-To-Libc |
¶ Calendario delle lezioni
Gli argomenti trattati nelle lezioni di laboratorio segue solitamente questo ordine:
- GDB + Ghidra + Calling Convention x64
- Buffer Overflow
- Shellcode Injection
- ASLR
- Canary + Leaking dallo stack
- ROP
- Seccomp
¶ Link Utili
- GDB CheatSheet (https://nextcloud.laser.di.unimi.it/s/riwx7MWgYwKDmCN)
- Pwntools CheatSheet (https://nextcloud.laser.di.unimi.it/s/wDWLGkiHpwsrSM9)
- Syscall table (https://nextcloud.laser.di.unimi.it/s/qp8DQjwLX34DiAA)
- x64 ASM CheatSheet (https://nextcloud.laser.di.unimi.it/s/PTe98jmZRrcxCd7)
- Soluzioni Mirco 2024 (https://gitlab.com/Kr1bas/software-security-2023-24)
- Soluzioni Mirco 2025 (https://gitlab.com/Kr1bas/software-security-2024-25)
- Repository registrazioni lab (https://nextcloud.laser.di.unimi.it/s/G57p72FtDQpsgyP)